We are happy to announce that it is now possible to export your configuration to a JSON file and also to import configuration data from a JSON file.
Exporting your configuration to a json file
There are several reasons why you would want to export your configuration data from MyRapidi:
- The JSON file can serve as a backup of your configuration
- You could use the JSON file as a documentation of your configuration (this could also be accomplished with our PDF feature)
- To compare different versions of e.g. a transfer - using an external tool like diff
- To copy configuration items from one service to another service (export from one service and import in another service)
- Ability to work with your configuration data in an external editor and then import it into MyRapidi again
The JSON file exported from MyRapidi can of course be imported again either in the same or in a different service. We have kept sensitive information such as passwords on Connections out of the JSON file.
Depending on your specific needs you can either export all of the configuration or only specific parts. In the following paragraphs we will explain the different possibilities.
EXPORT ENTIRE CONFIGURATION FROM THE DASHBOARD
You can export your entire configuration (all Groups, Connections, Transfers, Tags, Link Storages and Schedules) to a JSON file by clicking the 'json' button. For the moment this file cannot be imported directly, but you can copy specific parts (a Transfer or a Connection etc.) into a separate file and import this file under the corresponding tab.
EXPORT Parts of your CONFIGURATION FROM A SPECIFIC TAB
Under each configuration tab (Transfers, Schedules, Groups, Connections, Tags, RTI and Link Storages) you can export the corresponding part of your configuration to a JSON file. You can export either all items or only selected items.
For example if you want to export all your Connections, click the 'json' button without selecting anything. A JSON file with all your Connections will be generated and downloaded.

image 1: the export to JSON button under the 'Connections' tab
EXPORT SPECIFIC ITEMS TO JSON
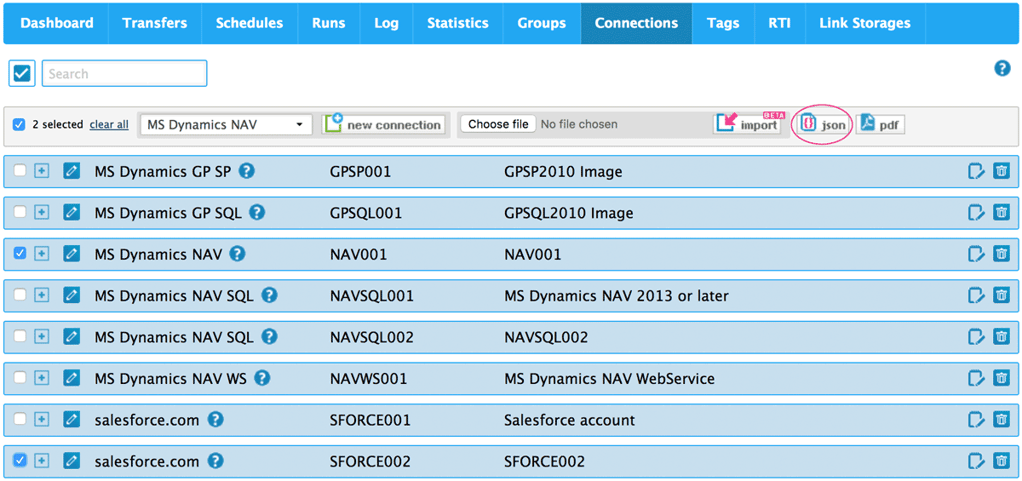
If you only want to export some items you can select these items by clicking the select box for each item and then click the 'json' button to export the selected items.
In this example I would like to export the MS Dynamics NAV and salesforce.com Connections, so I have selected these. Then I click the 'json' button to export these two Connections and a JSON file will be downloaded to my computer.

image 2: selecting two Connections and exporting the two Connections to JSON
import configuration data from a JSON file
The import function allows you to import configuration data from a JSON file. The JSON format and data that can be imported under a specific tab corresponds to the data exported under the same tab. If you want to be sure that your JSON file can be imported, please try to export the same kind of data to JSON (Transfer, Connection etc) and compare it with your file.
If you edit a JSON file please be sure that your editor is set to work with plain text and uses UTF-8 encoding. We have the best experience with using Notepad (Windows) or TextMate (Mac).
ONLY NEW ITEMS ARE IMPORTED
The import feature will check if each item already exists in the configuration (based on its code) and only import items that do not exist in the configuration. All items that already exist in the configuration will simply be skipped and only new items will be imported. If you have a JSON file with two Connections named NAVSQL001 and NAVSQL002 and in your configuration you already have a Connection with code NAVSQL001, then only the NAVSQL002 Connection will be imported.
We have chosen to consistently let the import feature skip existing items, because in some cases (e.g. a Transfers with Field Lists and SubTransfers) it would not be obvious how to update an existing item.
How to import a JSON File
The import feature is available under Transfers, Schedules, Groups, Connections, Tags, RTI and Link Storages. Simply choose your JSON file from your computer (or whereever you have it stored) and then click the 'import' button.
If there are any errors in the format or the data in the file a corresponding error message will be shown. JSON format errors can be quite difficult to find in a file. The best way is to use an online tool to check your JSON file if you suspect any errors.
If the import succeeds then a message is shown to let you know how many items have been imported and how many have been skipped. The successfully imported items will be marked as selected and the filtering on the page will be set to 'only selected'. In this way you can easily get an overview of the successfully imported items.
In the image below you can see the import feature under Connections.

image 3: choose your JSON file and click the 'import' button
After choosing a JSON file with two new Connections and clicking the 'import' button, a message will be shown on how many have been successfully imported and the imported Connections will be selected and shown (see image 4).

image 4: two Connections successfully imported
We hope you like these new features. If you have any comments and feedback are as always welcome.
SIGN UP FOR OUR PRODUCT UPDATE WEBINARS
A lot of new and exiting features have been included in our latest release. If you would like to learn more about the import/export feature and other new product features sign up for our Product Update Webinar and get up to date on whats new in our latest release. Sign up and save your seat. See you at the webinar!


