Security: Make strong authentication easy for users
In November 2021 we released our support for passkeys (back then called Security keys) as an authentication method for Myrapidi. We are pleased to announce that we have done further development on even stronger authentication. In this article, we will go through what a passkey is, how to use it with MyRapidi, and which passkeys are right for your organisation to ensure strong authentication is easy for users.
Some history
The term passkey was first popularized in June 2022 when Apple announced they would be adding support for passkeys in iOS and macOS. This was the first time that most people had heard of the term, and many assumed that it was specific to Apple. However, the term is also used by other companies such as Microsoft and Google.
The passkey implementation from Apple, Microsoft, and Google all relies on the FIDO2 and WebAuth standards that have existed since xxx. But in order to get a wider adoption of a more secure authentication the big three implemented a non-hardware bound option relying on their respective login accounts and renamed the daily term from security keys to passkeys.
What is a passkey
A passkey is a digital credential that is used as an authentication method for websites and applications. The passkeys standard is a type of passwordless authentication, promoted by the World Wide Web Consortium and the FIDO Alliance. They are often stored by the operating system or web browser and synchronized between devices from the same ecosystem using the cloud, however, they can also be confined to a single device such as a physical security key also known as a hardware-bound passkey.
Synced versus hardware-bound passkeys
As mentioned above, you have two different passkey implementations: synced and hardware-bound.
Synced passkeys are authentication credentials that are synchronised or shared across multiple devices such as smartphones, laptops, and tablets connected to a user account. The main idea is to have the same authentication credentials available on all the user's devices, allowing for a consistent login experience across different platforms and devices.
Hardware-bound passkeys are authentication credentials that are securely bound to a specific hardware device such as a USB key - like the Yubikey - or other pieces of hardware separate from everyday devices. This means that the passkey's private key material is stored and protected within dedicated hardware, ensuring that the key cannot be easily accessed, copied, or moved to other devices. The hardware-bound passkey option delivers higher security assurance compared to the synced passkey option.
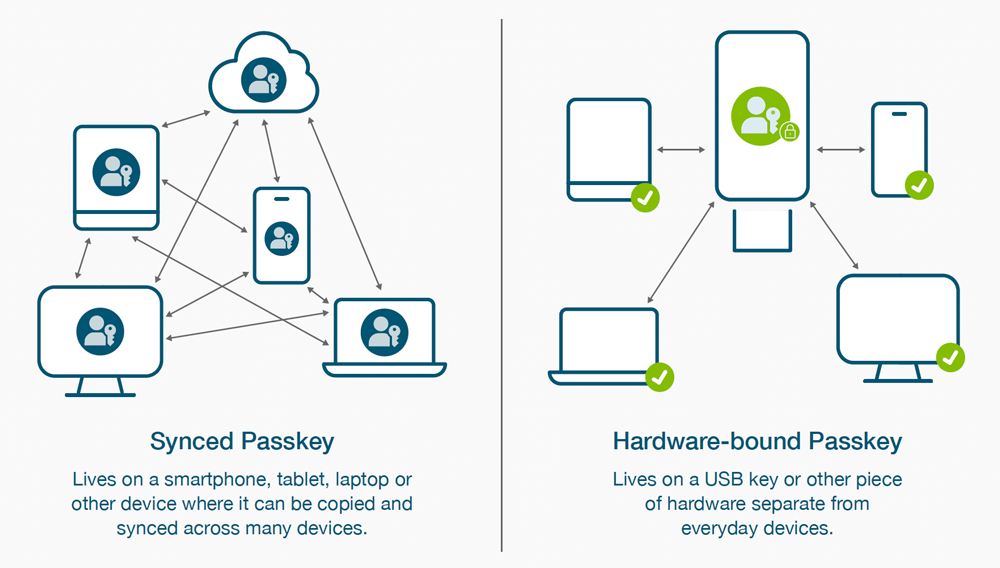
Image source: Yubico
The Main difference between synced and hardware-bound passkeys
The main difference between synced passkeys and hardware-bound passkeys lies in their storage and authentication process:
- Synced passkeys are authentication credentials that are synchronised or shared across multiple devices, offering convenience but potentially raising some security concerns.
- Hardware-bound passkeys are cryptographic keys stored in dedicated hardware devices, providing a higher level of security and protection against various attacks.
Which passkeys are right for your organisation?
Passkeys are designed to be more convenient and phishing-resistant than conventional authentication methods. Passkeys are more secure than passwords and enable a move to passwordless authentication that enables greater security and efficiency. Which type of passkeys would be the best solution for your organisation will totally depend on which internal security policies your organisation operates after, and using one of the methods will keep you much more secure than just relying on passwords. Passkeys are better than passwords because they’re based on modern FIDO protocols and offer stronger protection against phishing.
In the infographic below the different usages of each method are illustrated, and might help you be more clear about which implementation method to use for your organisation.
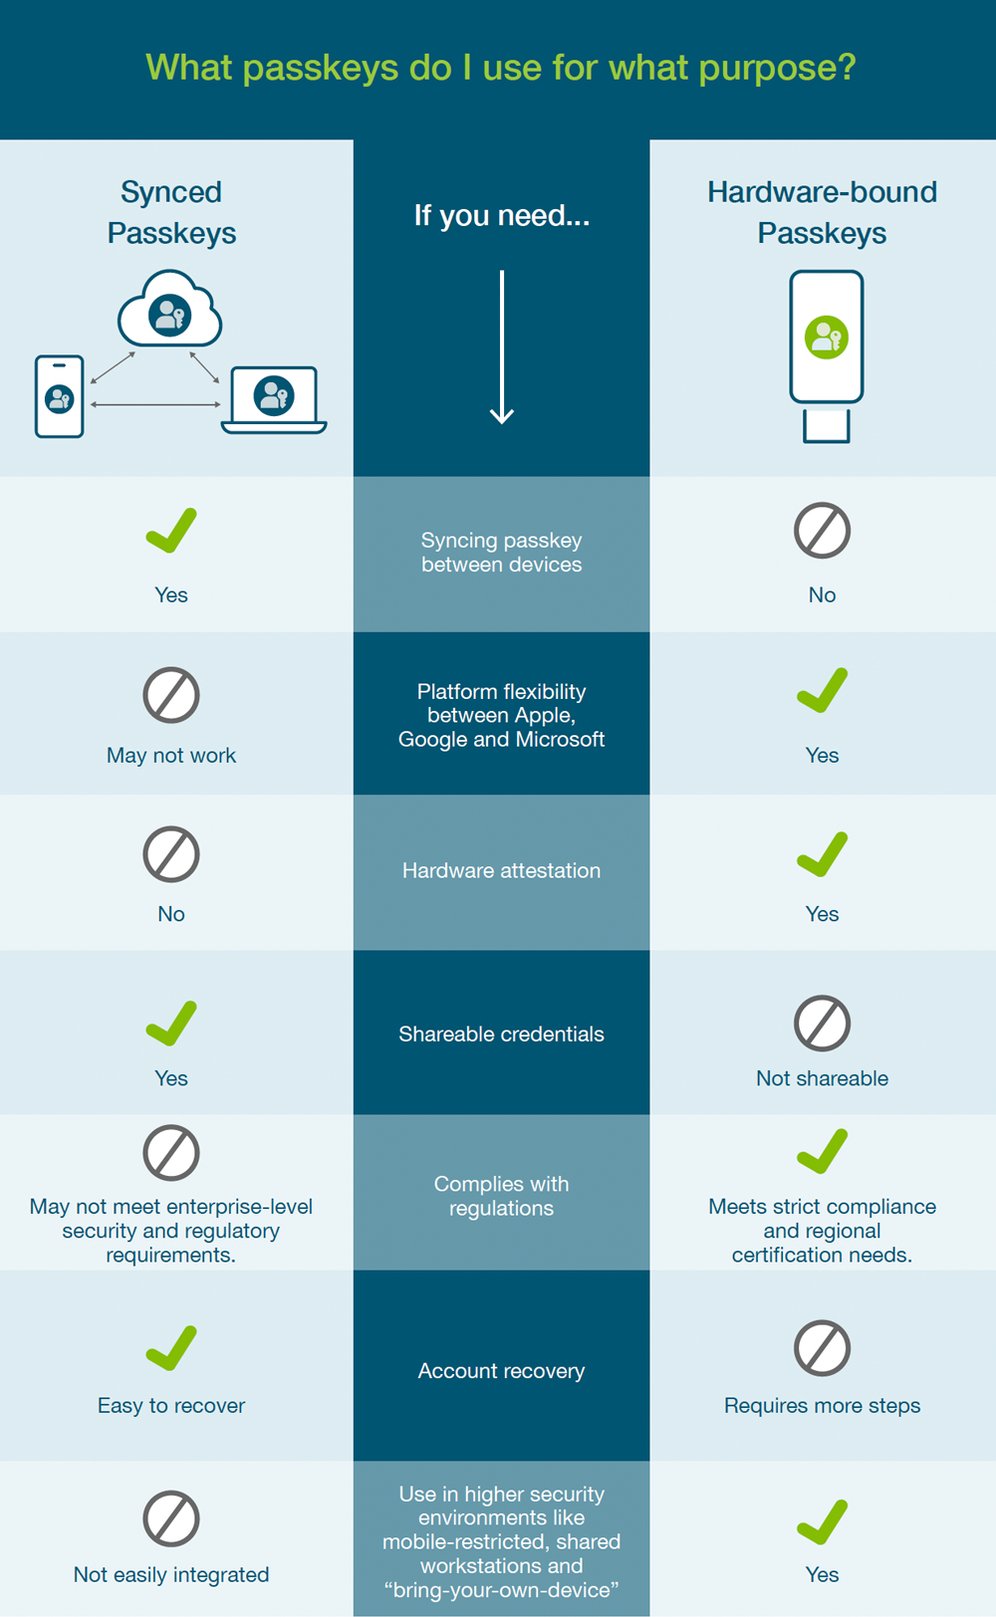
Image source: Yubico
|
Synced Passkeys
|
If you need ….
|
Hardware-bound Passkeys
|
|
YES
|
To sync passkey between devices
|
NO
|
|
May not work
|
Platform flexibility between Apple, Google, and Microsoft
|
YES
|
|
NO
|
Hardware attestation
|
YES
|
|
YES
|
Shareable credentials
|
NOT Sharable
|
|
MAY NOT meet enterprise-level security and regulatory requirements
|
Complies with regulations
|
YES - Meets strict compliance and regional certification needs.
|
|
Easy to recover
|
Account Recovery
|
Requires more steps
|
|
Not easily integrated
|
Use in higher security environments like mobile restricted, shared workstations, and “bring-your-own-device”
|
YES
|
PROS & CONS OF THE TWO AUTHENTICATION METHODS
Synced Passkeys: Pros:
- Accessibility: Synced passkeys are usually stored on a user's multiple devices (e.g., smartphone, tablet, laptop), making them readily accessible wherever the user goes.
- Convenience: Users can easily switch between devices without needing separate hardware tokens.
- Backup options: In case a device is lost or stolen, users may have the option to recover or reset their synced passkeys using account recovery methods.
Cons:
- Vulnerability to Device Compromise: If a device where the synced passkey is stored becomes compromised, it could lead to potential security risks if attackers gain access to the passkey.
- Single Point of Failure: If a user's primary device is lost, damaged, or unavailable, and they haven't set up proper backup options, they may have difficulty accessing their accounts.
Hardware-Bound Passkeys: Pros:
- Enhanced Security: Hardware-bound passkeys are physically separate from the user's devices, making them less vulnerable to software-based attacks or malware.
- Phishing Protection: Hardware keys offer protection against phishing attacks because they require physical interaction to authenticate, which cannot be replicated by malicious websites.
Cons:
- Dependency on the Physical Key: Users need to carry the hardware key with them, which may be cumbersome for some individuals.
- Cost: Hardware keys typically have an upfront cost, which might be a deterrent to widespread adoption.
In summary, the choice between synced passkeys and hardware-bound passkeys depends on the balance between security and convenience that your organisation prioritizes. Synced passkeys offer greater convenience and flexibility but may be more vulnerable to device compromise. On the other hand, hardware-bound passkeys provide higher security levels but might require users to manage a physical token and incur additional costs.
WHY USE PASSKEYS WITH MYRAPIDI?
At Rapidi security is a top priority, so we take the use of passkeys very seriously and have enforced it internally. What does this mean? It means that when a user tries to log in without a passkey this is not possible.
Rapidi does support the synced passkeys method, but highly recommends the hardware-bound authentication method, as it still remains the most secure method. As hardware-bound passkeys- using the WebAuthn and FIDO2 standards - provide a very secure way to authenticate yourself and avoid practically all possibilities of account takeover.
A passkey can be set up in two different ways with MyRapidi - either as Passwordless (no password is needed at login) or as a Second Factor (like the Google 2FA but more secure as it is a hardware key). Passwordless authentication combines the use of a physical device (which has some unique key and the ability to securely authenticate with a service) and then some personal knowledge like a PIN code or a personal feature like a fingerprint.
So as passwords can be stolen or guessed (and used remotely), it is much harder for someone to get hold of both the piece of hardware AND the personal knowledge or feature (PIN code or fingerprint). Even strong passwords used in combination with 2FA codes (like what we support with the Google Authenticator app) are less secure than using passwordless login. Hackers could steal your mobile phone number remotely and get access to your email account and then reset your password and get into your account. With passwordless login enabled (and passkeys enforced), they will always need the physical hardware key also!
HOW TO ENABLE PASSKEYS ON MYRAPIDI
So how do you enable your passkey for your login?
You need the following items to use a passkey with MyRapidi:
- A browser that supports FIDO2. In general, regarding the latest versions of Google Chrome, Safari, or Microsoft Edge, visit this page for more details about FIDO2 and U2F support.
- A hardware-bound passkey (like YubiKey) or biometric devices like a built-in fingerprint reader in your laptop or mobile device.
Then to set up a passkey with MyRapidi:

Go to Personal Settings > Passkeys
MyRapidi will check if your browser is supported. If it is not supported, you will get a message about this
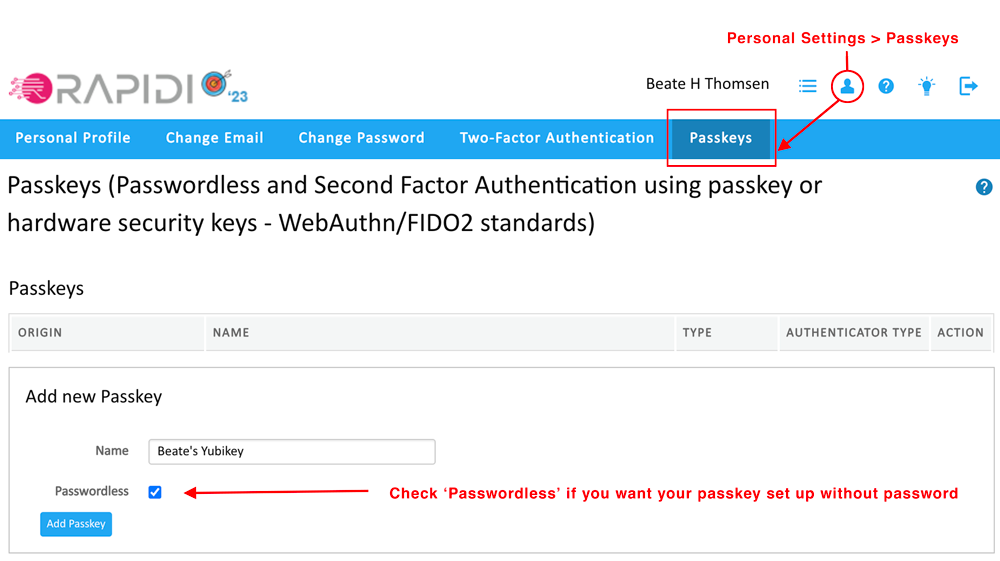
In the section “Add new Passkey” enter a name for your key (for example: "Beate's Yubikey")
Check the box "Passwordless" if you would like it to be passwordless, if you do not check it you will register it as a second-factor key.
Click the button "Add passkey"
Then follow the steps provided in the popup browser window as illustrated below:
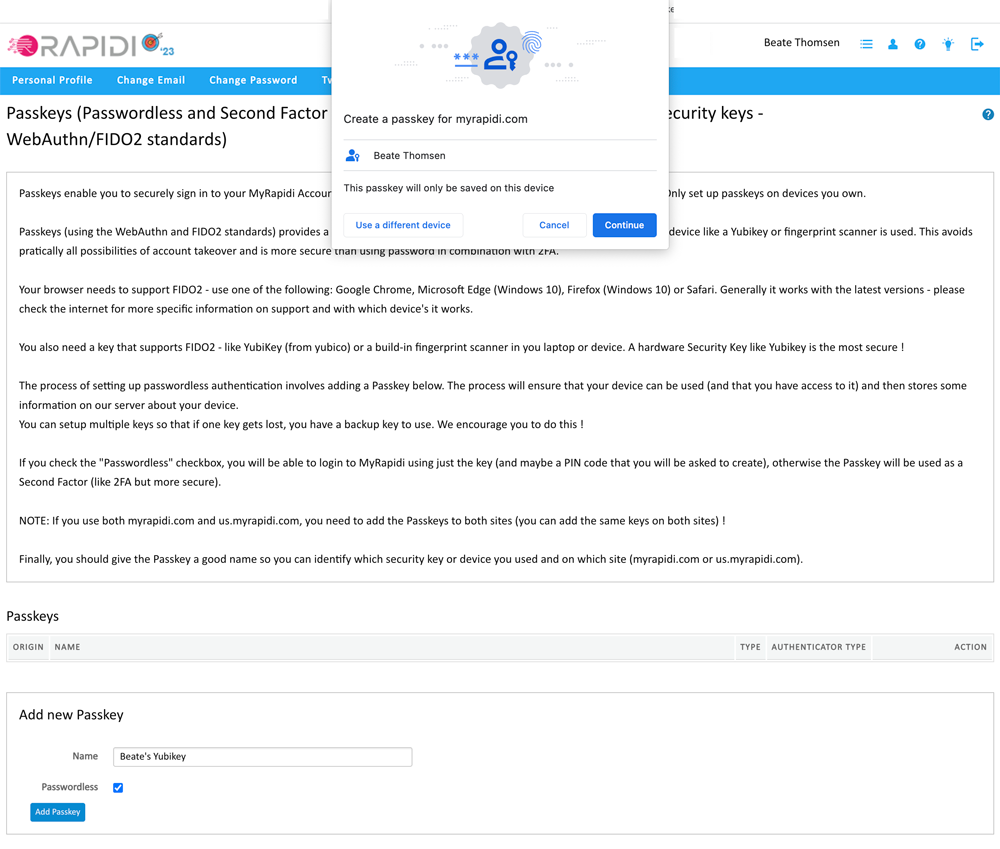
Once you click on "add passkey" the browser will prompt you with the first pop-up window. Click "Continue"
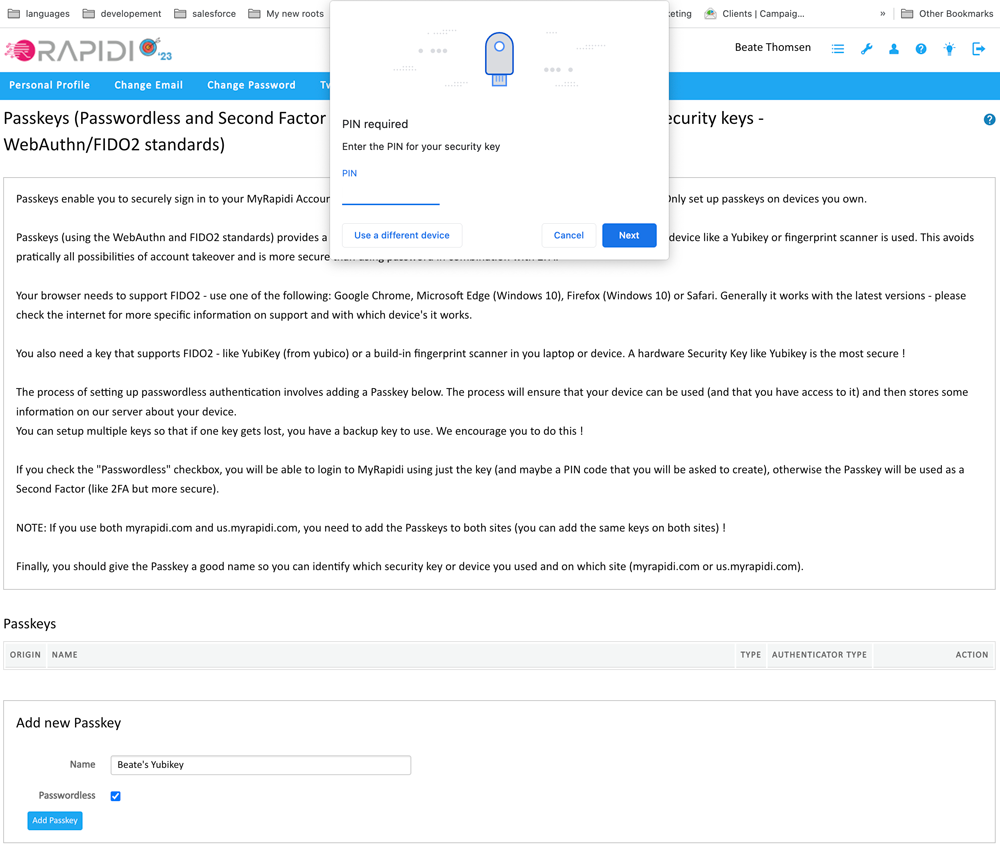
Enter the PIN code for your passkey
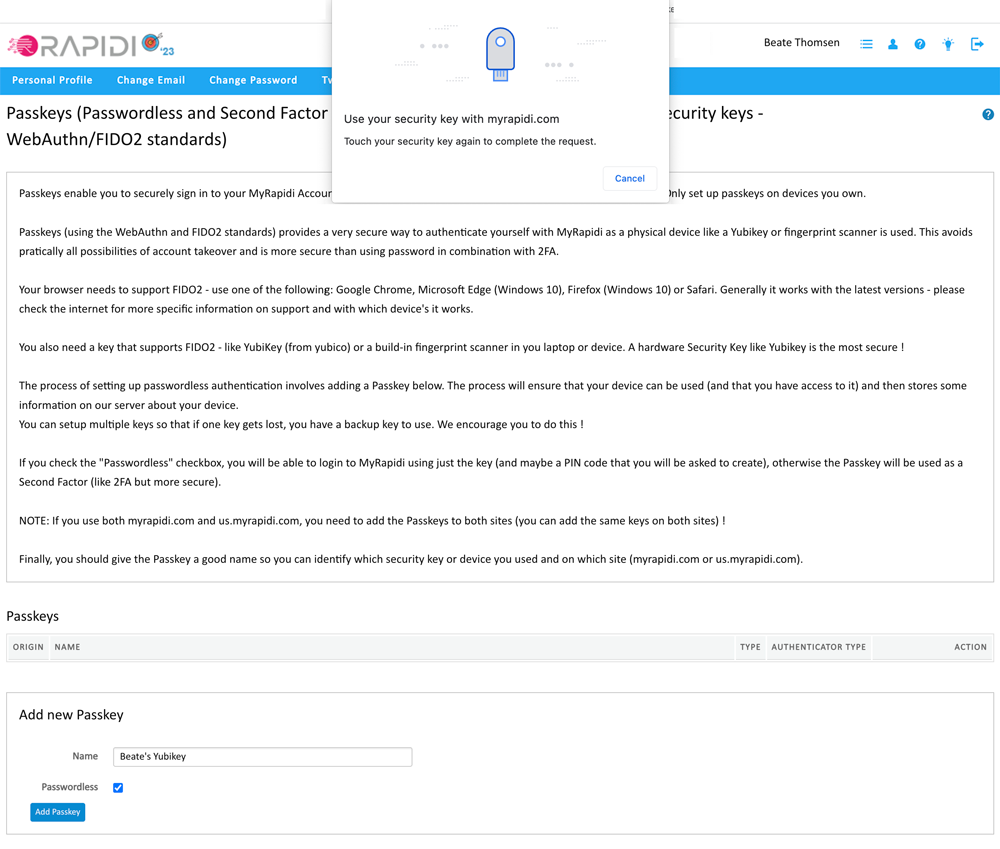
If you have not already done so, add your hardware-bound key to your device (laptop, desktop...) and touch it to complete the process.
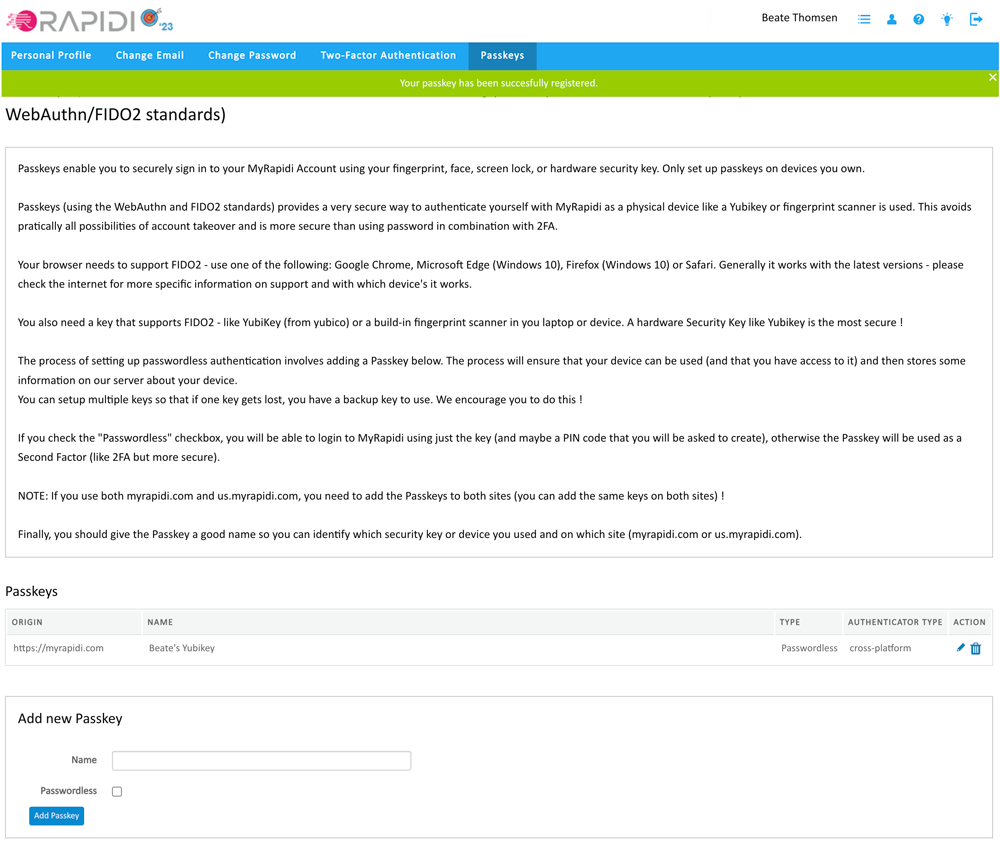
Congratulations! You have successfully added your first passkey, and you will see it in the list of active passkeys.
We recommend that you add at least two different devices so that you have a device that you normally use and a backup device. If you do not check the box "Passwordless" the key will instead be used as a secure Second Factor device. In this case, you still have to enter your password, and you then have a more secure second-factor authentication that MyRapidi will ask for after the password is entered.
After you have registered your passkey it will appear in your list of passkeys.
- Origin: the URL where it's registered under
- Name: the name you gave the passkey
- Type: either it will be passwordless or second factor
- Authentication type: a) platform: a synced passkey or b) cross-platform: a hardware-bound passkey
- Finally, in the action column, you can edit the name of your passkey or delete it.
Read more on our wiki: Passkeys
ENFORCE THE USE OF PASSKEYS
A system is only as secure as the weakest link and adding a security key is very good, but if you can cancel out of using the key and then login with just a password as before, then you do not really have a more secure system (but you do have a more convenient login method). As an Account Administrator, you can enforce the use of a passkey for a user. This means that the use of a passkey is always required to log in to MyRapidi. In order to do so you need to do two things: 1) enforce the use of a passkey for yourself as an admin and 2) enforce the use of a passkey for a user. For this two-step process go to Account Admin > Manage Users. Below we will walk you through this process.
ENABLE ENFORCEMENT FOR THE USE OF PASSKEY FOR YOURSELF AS ACCOUNT ADMIN
Again, to ensure the overall security of your MyRapidi account, it will require that you enable the enforcement of a passkey for yourself first.
To enable the enforcement for yourself please ensure that you have added at least 1 passkey to yourself (under Settings -> Passkeys), then go to 'Manage Users' and click the key icon with the "+" for your user.

step 1: enforce the use of Passkeys for yourself
A key icon with a "*" will appear in the 'Keys' column.
Please note that for security reasons you cannot undo the enforcement yourself. To disable the enforcement you will need to ask another MyRapidi Account Administrator.
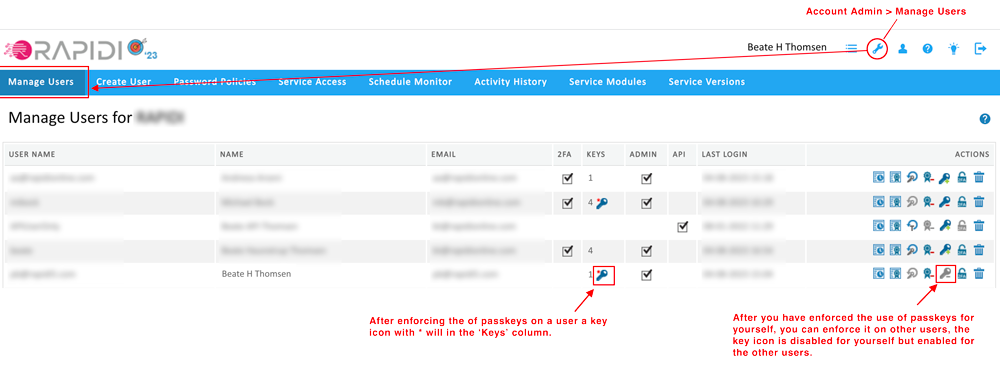
step 2: after enforcing the use of Passkey for yourself - the right to enforce it on other users becomes available
ENABLE ENFORCEMENT OF THE USE OF A PASSKEY FOR A USER
After you have enforced the use of a security key for yourself you can enforce the use of passkeys for other users. If you enforce the use of passkeys for a user who has not yet set up a passkey, the only way for the user to log in to MyRapidi is for the Account Administrator to reset the user's password. After resetting the password, the user will be able to log in and can then set up a passkey. So it is better to wait for the users to set up some security keys, but you can force them like this.
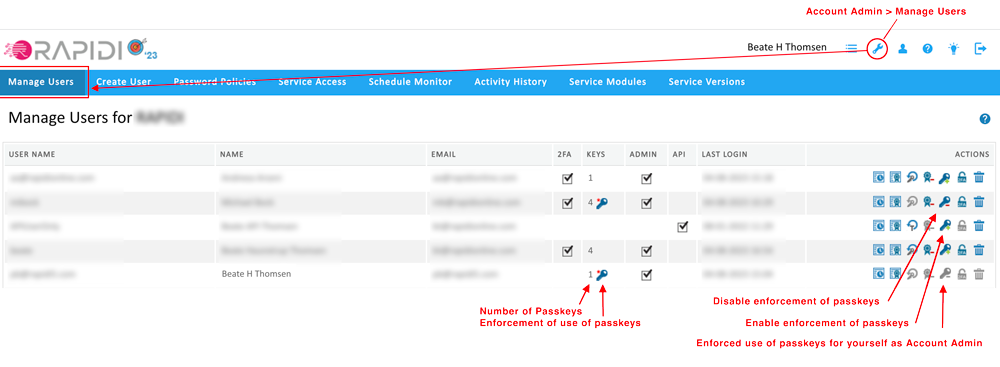
image: an overview of users who have the use of passkeys enforced
MANAGE USERS - SOME ADDITIONAL FUNCTIONALITY
In order to make it easier for MyRapidi Account administrators to ensure the strong security of their MyRapidi Account, we have added additional functionality on the 'Manage Users' page. First of all, you will be able to see the activity history for each user and what Services the user has access to. As before, you can also reset a user's password, assign or remove admin rights to a user, disable 2FA for a specific user and delete a user. The image below should give you an overview of the possibilities to manage your users.
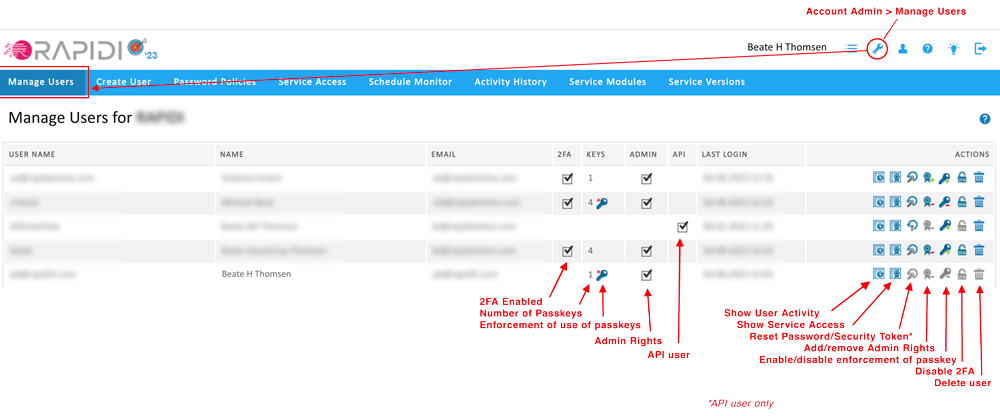
image: Account Admin > Manage Users Read more on our wiki: Manage Users
LOGIN PROCEDURE
With the support for passkeys, the login process is a two-step process. The first step will be to put in your user name and click "Continue".
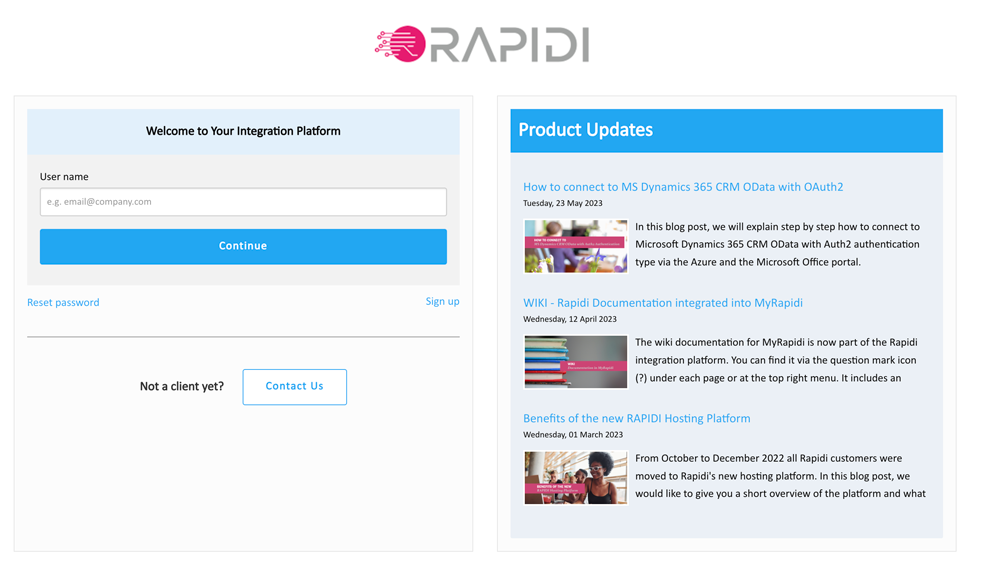
The next step will depend on what has been set up for the specific user. If you have set up a fingerprint reader on your laptop, then you just touch the fingerprint reader, and you are logged in.
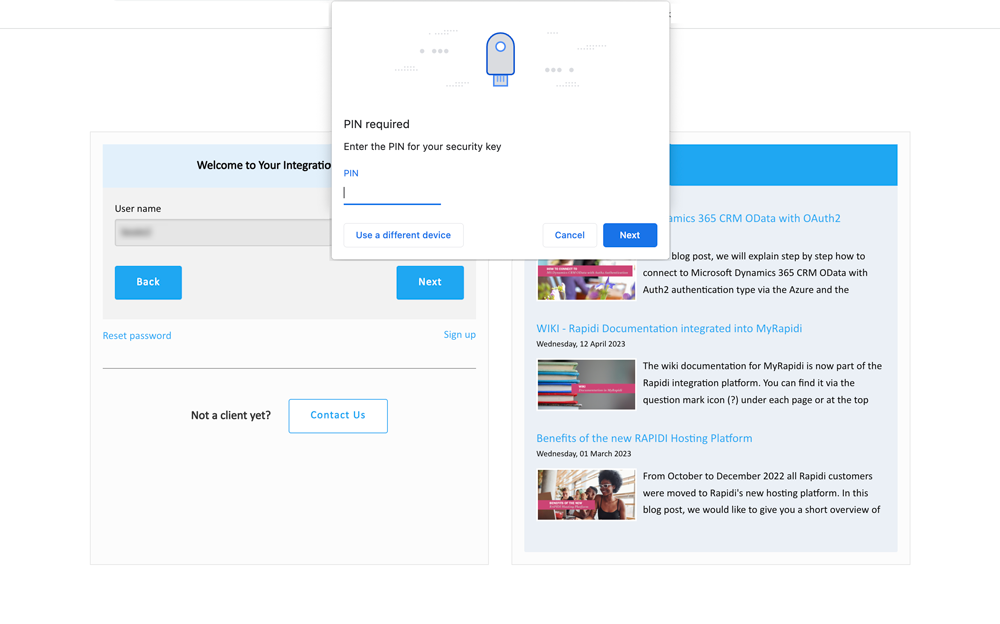
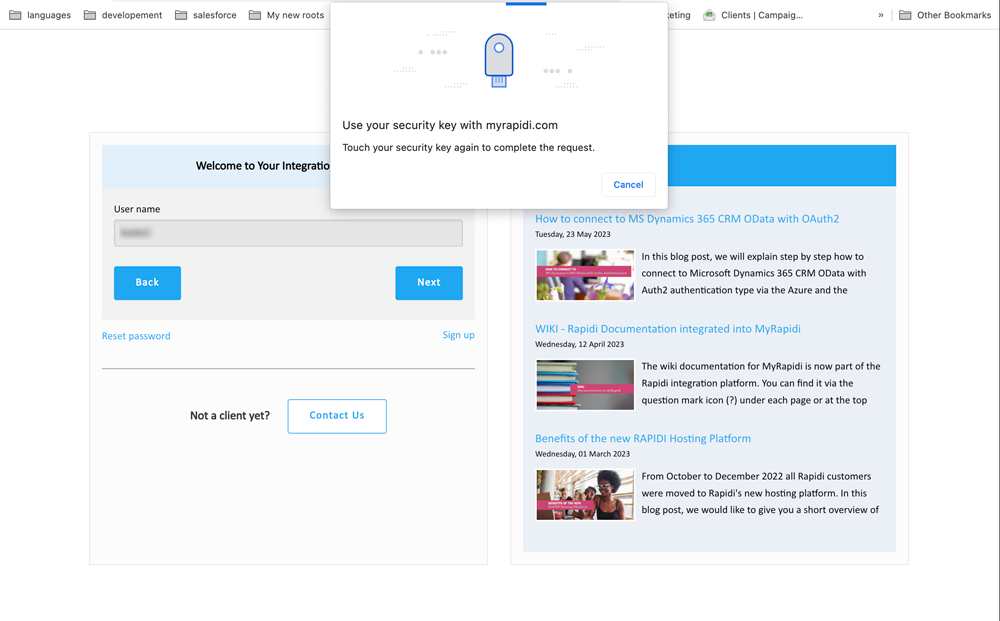
If you have set up your passkey with a hardware-bound device you will be prompted with the browser pop-up that pretty much resembles the process when setting up your passkey in myrapidi.com.
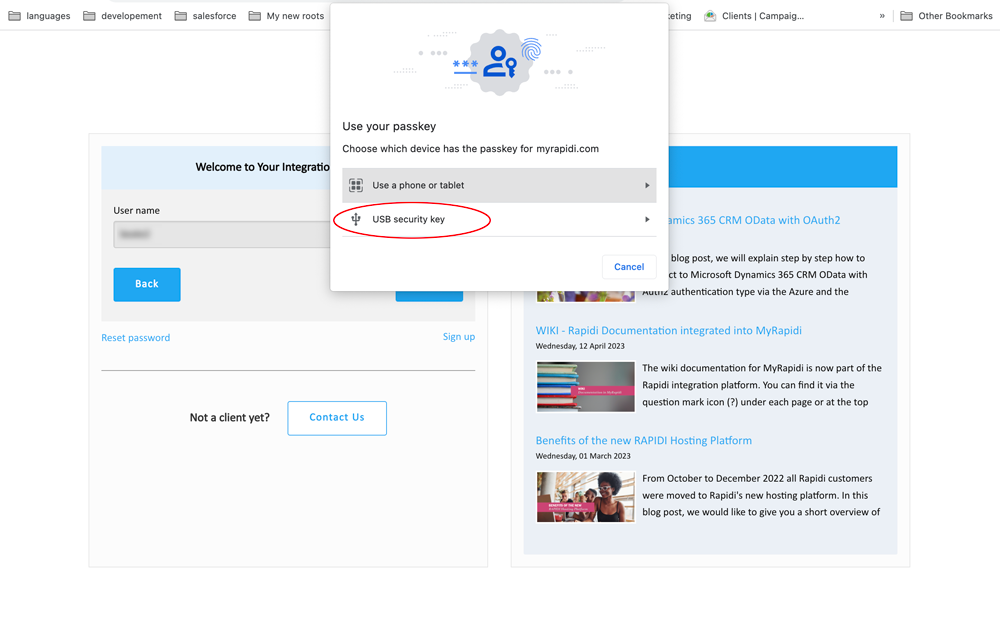
Choose "USB security key"
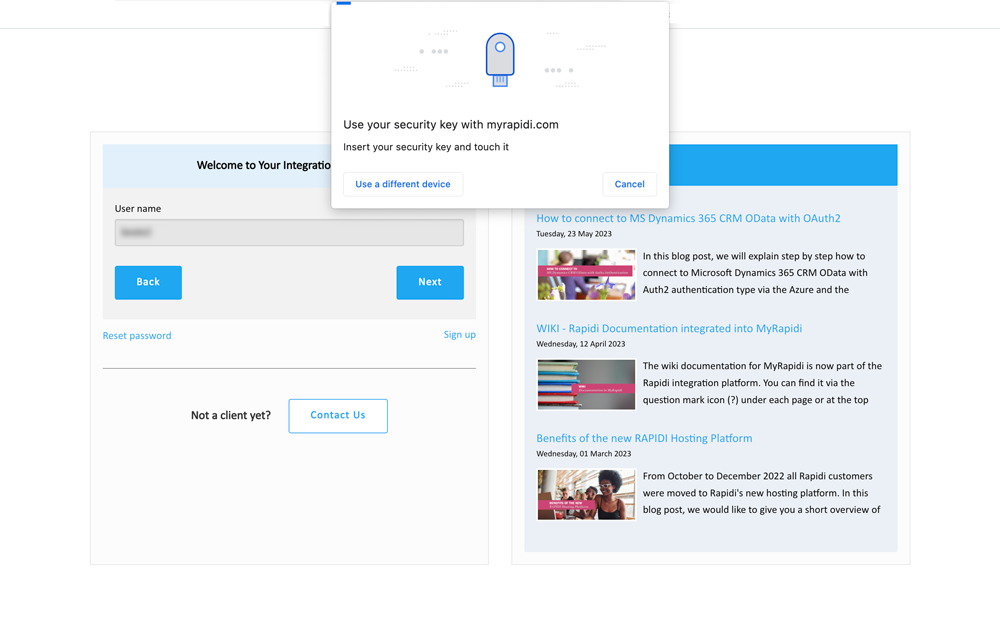
Insert your passkey into your device (if you have not already done so) and enter your PIN code for your passkey. Click "Next".
Touch our passkey again to complete the process and you will be logged in. Congratulations! You have successfully logged in to MyRapidi.
If you have not yet set up any passkeys (and it is not enforced) it will ask you for your login credentials with password and 2FA.
